Using Godot Timers
How to use the Godot Timer node in slightly more complex scenarios.
The Basics
Firstly, the Godot documentation actually covers the very basics of using
Timer
for simple applications very well. This is covered in the
main game scene section of the iconic Dodge the Creeps tutorial.
In fact, there are many great
demo projects from the Godot contributors
that are worth checking out after learning the basics of how the Engine works.
I highly suggest reading through the Timer section from Dodge the Creeps before continuing on
to the later sections of this post. The Godot tutorial covers:
- adding
Timernodes to the scene - setting their
wait_timeproperty - setting their
autostartproperty - setting certain
Timers asone_shot - and even using a
SceneTreeconvenience method to create a temporary one-shotTimer(found in the Heads up display section of the tutorial)
Timers that Need to Pause
Say we have some Timer that needs to be delayed before re-starting. A second Timer can be used
to impose this delay. This may seem like an arbitrary over-complication, since you could simply add
that delay to the wait_time. However, that approach has several limitations:
- if the delay is imposed by, say, an animation, then the animation timing is strictly linked to
the delay imposed in the
wait_timeof theTimer - if the delay is something that may be paused independently of the
Timer, then it becomes more difficult to manage the state necessary to keep track - the original
wait_timewould include the delay as well, otherwise, it would require extra code to add it on after the first timeout
To illustrate a fictitious game mechanic as an example scenario, imagine a farming game where crops need to be watered with a hose that repeatedly gets clogged after a fixed time. To clear the clog, the player has a farming helper NPC who will automatically initiate the clog-clearing action. After a short time, the hose begins to spray again.
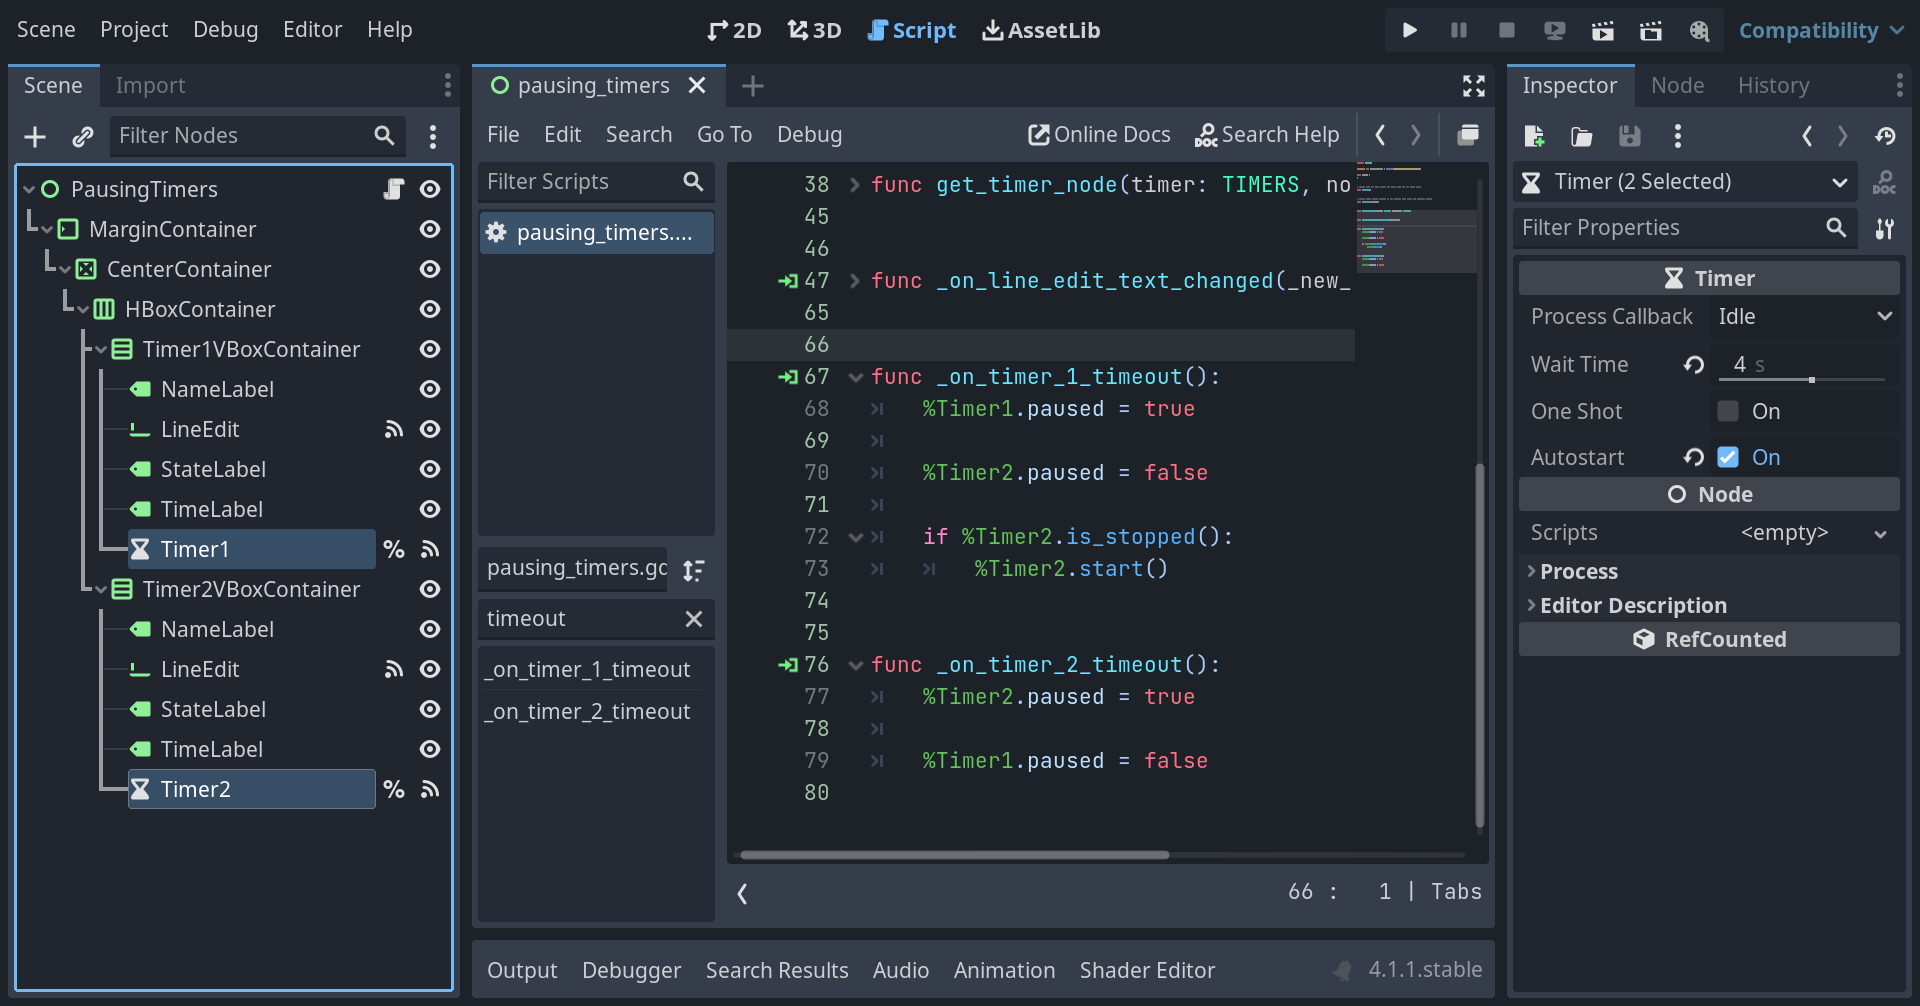
Here is what the two Timer approach would look like in Godot (pausing_timers.tscn from the
project linked at the bottom of this post):

Control-derived nodes surrounding the Timer nodes, as these were setup for the purposes of the demo game.
In this case, Timer1 has a wait_time of 4 and is set to autostart. Timer2 has a wait_time
of 2 and does not autostart. This means, that on Timer1 timeout, Timer2 must be started
(only the first time or, alternatively, when it is stopped). The code for this can be seen in the
screenshot above, however, the portion relevant to the Timer operation can be seen below:
|
|
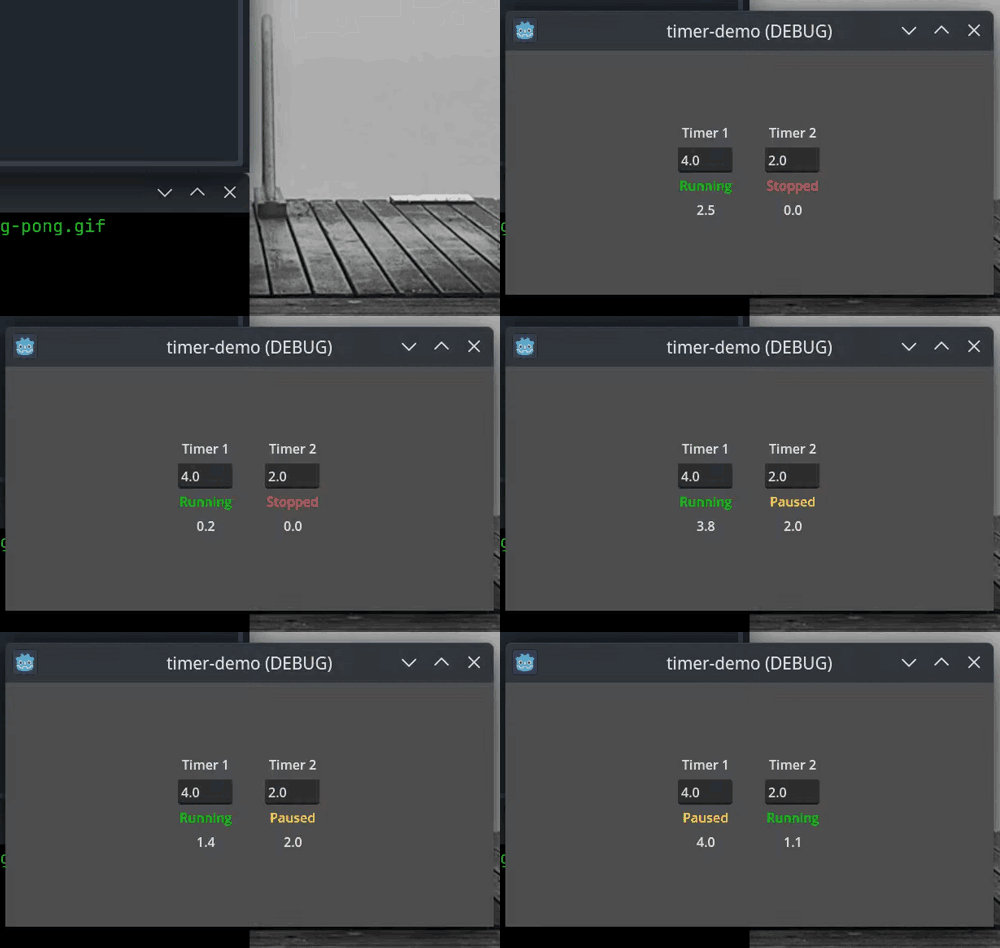
This is what that behavior looks like (displayed via Control nodes for example):

The demo project let’s you change the wait_time for each Timer via the LineEdit nodes below
each Label. It is highly encouraged to download
the demo project
and try it out for yourself.
As can be seen, Timer2 (because it is not set to autostart) is stopped when the game starts.
After it is started, however, it simply toggles its paused state, just as does Timer1.
Why This is a Good Strategy
To illustrate an advantage of this approach, let us consider the alternative of having Timer2 also
be set to autostart:
- both
Timersstart when the game starts Timer2will have timeout signaled after 2 seconds, which will…- pause itself
- unpause
Timer1(which is already not paused, so no problem here)
- then
Timer1will have its timeout signaled after another 2 seconds (4 seconds since the start of the game), which will…- pause itself
- unpause
Timer2(starting the looping process over)
As described above, as long as the player is not aware of Timer2 running at the start of this
process (which may require some extra code to ensure), this works basically the same. However, let’s
introduce a slight change in requirements.
What if Timer2 needs a wait_time of 5 seconds (1 second longer than Timer1). The process
breaks down when Timer1 signals timeout before Timer2 has signaled timeout, thus leaving only 1
second of time left until Timer2 signals and unpauses Timer1.
Timer2 to unpause Timer1 (for the first time) after only 1 second instead of 5.
Here is the procedural description of the above (for clarity):
…remember, Timer2 wait_time is now set to 5 seconds (Timer1 is still 4)…
- both
Timersstart when the game starts Timer1will have timeout signaled after 4 seconds, which will…- pause itself
- unpause
Timer2(which is already not paused, so no problem here)
- then
Timer2will have its timeout signaled after only another 1 second (5 seconds since the start of the game), which will…- pause itself
- unpause
Timer1too early (starting the looping process over)
Recap
The example provided above is a clear indication that having both “paused” and “stopped” states is
an advantage for the flexibility and composition of the Timer node.
Timers that Need to Stop
The above example assumes that the timers involved will run in perpetuity and their wait_time
values will never be altered. This works out well for that example, since it is much simpler to
toggle the paused state of each and need do nothing else.
Another example scenario might require some action to be taken by the player before triggering the
delay represented by Timer2. In this case, it would not be appropriate for the timeout signal to
simply pause/unpause because the timers would always be running.
As a continuation of the game mechanic example from above, pretend we have decided to only allow the player to unlock the farming helper NPC after they have reached a certain level. Until that time, it is the player’s responsibility (via some user action) to clear the clogs in the hose.
With this new requirement, we now have to alter the behavior of our timeout signal code so that:
- the timeout signal of
Timer1does not automatically runTimer2 - the player can take some action to run
Timer2, if and only if,Timer1has already signaled timeout
This is where the clever implementation of Godot’s Timer node shines. To understand what I mean,
we must look at a few implementation details from the node’s documentation:
paused
and
start().

Timer's 'paused' property
…will not process until it is unpaused again, even if start is called.
This is great because calling start() will not run a Timer that is paused, whereas it would
run if it were stopped.

Timer's 'start' method
…resets the remaining time to wait_time.
That makes start() basically function like a “restart” and we do not have to manage resetting the
internal Timer state back to wait_time. However, this does mean we will need to prevent
start() from being called again before the next timeout of Timer2 (to prevent the player from
endlessly delaying the run of Timer1, or being run before Timer1 has signaled timeout).
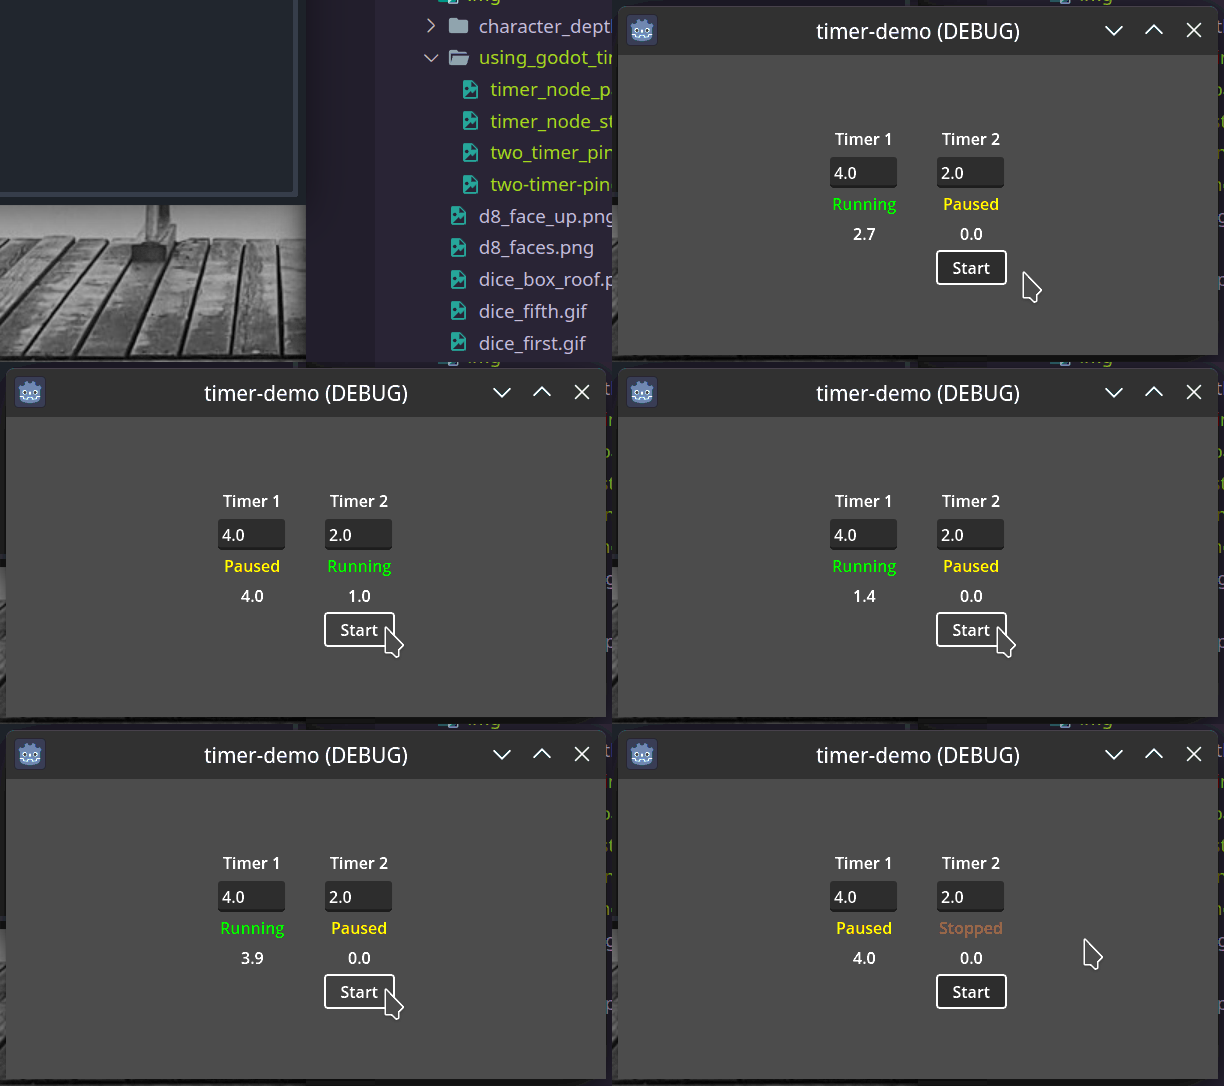
Putting all of this knowledge into action gives us the perfect composition of behavior:

Notice how the “Start” button is pressed several times during different states of the timers, but
Timer2 does not run until the desired conditions are met.
The code for this (relevant sections only) is now:
|
|
|
|
Wrapping Up
Hopefully, I have illustrated the utility and simplicity of Godot’s Timer interface. I, surely,
have benefited from the use of it in my projects.
More examples of Timer in use can be found by searching through the Godot demo projects' repo,
like so: https://github.com/search?q=repo%3Agodotengine%2Fgodot-demo-projects+Timer+language%3AGDScript&type=code&l=GDScript.
It also worth noting that the documentation recommends using a _process loop instead of a Timer
when dealing with very low wait_time values:

On the flip side of this, if your wait_time is longer than the recommended value, the Timer node
has the advantage of being affected by Engine.time_scale and SceneTree.paused. This makes it
the perfect solution for real-time behavior and simulations, without having to write any custom
management code.
The demo project set up for this post can be found here.